


If you dream of a lush lawn that instantly makes your property the envy of the neighborhood, sod installation might be what you’re looking for.
With its numerous advantages over other methods, sod installation offers convenience and instant results. In this step-by-step guide, we will take you through the entire process of sod installation, equipping you with the knowledge and confidence to transform your outdoor space into a stunning oasis.
Preparing for Sod Installation
Before diving into the sod installation process, it’s crucial to properly prepare your site to ensure the best results for your new lawn. Adequate preparation sets the stage for healthy grass growth and a long-lasting, visually appealing lawn.
To begin, assess your lawn and soil conditions. Observe the amount of sunlight your lawn receives throughout the day, as this will help determine the type of sod that will thrive in your specific environment. Additionally, evaluate the soil quality, looking for signs of compaction, poor drainage, or nutrient deficiencies.
Accurate measurements are crucial to ensure you order the correct amount of sod for your lawn. Take precise measurements of the area you plan to cover, accounting for irregular shapes or corners. Use these measurements to calculate the square footage and consult with your sod supplier to determine the quantity of sod needed.
It’s always advisable to order a bit extra to account for any trimming and potential errors during new lawn installation.
We recommend having professionals install the fresh sod for you, but if you plan on installing it yourself, gather all the necessary tools and materials before your sod is delivered. Typical tools include a rake, shovel, wheelbarrow, soil amendments (if required), a sprinkler or watering system, and a sharp knife or sod cutter for trimming.
Getting Your Ground Ready
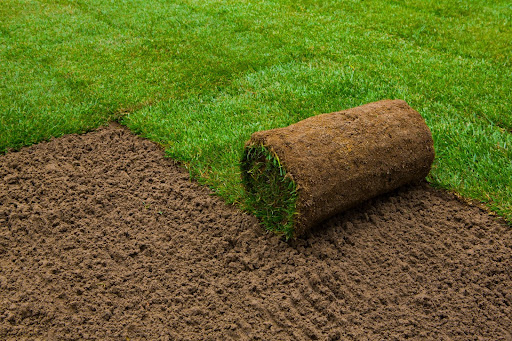
To ensure optimal grass installation, you need to prepare your ground before laying down the rolls of lush green grass. This step is crucial for creating a smooth, well-drained surface that promotes healthy root growth and prevents future issues.
The first step in getting your ground ready is to clear the area of any existing vegetation, debris, and rocks. Remove weeds, grass, and other plants by digging them up or using an herbicide, ensuring you follow the product’s instructions carefully.
Clearing the site allows you to start with a clean slate, eliminating competition for resources and creating an ideal environment for your fresh sod to flourish.
Next, it’s time to grade the soil. Grading involves leveling the ground and ensuring proper drainage across the entire area. Use a rake or shovel to fill low spots and remove excess soil from high areas.
Aim for a slight slope away from structures to prevent water accumulation. This grading process helps water to flow evenly and prevents puddling, which can lead to issues like root rot and uneven growth.
Depending on your soil’s quality, you may need to amend it with compost or topsoil. Soil amendments improve nutrient levels, enhance drainage, and promote healthy root development.
To determine if you need amendments for your soil, conduct a soil test to assess its pH level and nutrient content. Follow the test results to add the recommended amendments and incorporate them into the soil thoroughly if necessary. This step ensures that your sod has a fertile and well-balanced foundation for growth.
What Should My Soil’s pH level be?
Maintaining the proper pH level in your soil is crucial for the health and vitality of your fresh sod. The pH level indicates the soil’s acidity or alkalinity and significantly affects plant nutrient availability. Most grass varieties’ optimal soil pH range is slightly acidic to neutral, typically between 6.0 and 7.0.
Why is soil pH important? Well, it directly influences the availability of essential nutrients to your sod. When the pH level is too high (alkaline), nutrients like iron become less accessible to the grass.
Conversely, vital nutrients such as calcium, magnesium, and potassium may be limited in highly acidic soil. Maintaining the proper pH level ensures that your sod has access to the nutrients it needs for healthy growth.
To determine your soil’s pH level, use a soil testing kit or send a sample to a local agricultural extension office or soil testing laboratory. Once you have the test results, you’ll know if your soil’s pH level falls within the desired range or needs adjustment.
If your soil is too acidic (pH below 6.0), you can raise the pH level by adding lime. Lime is commonly used to neutralize acidity and raise the pH of soil. The amount of lime required will depend on the current pH level and the soil type. Following the manufacturer’s instructions and recommendations based on your specific soil conditions is essential.
Conversely, if your soil is too alkaline (pH above 7.0), you may need to lower the pH level. This can be achieved by adding elemental sulfur or aluminum sulfate. Again, it’s crucial to follow the recommended application rates and instructions provided.
If you have any questions about the pH level of your yard, be sure to talk with a sod professional; they’ll be able to answer any questions you may have and advise on how to prepare your lawn for sod installation.
Ordering Sod
When it comes to sod installation, ordering the right type and quantity of sod is essential for a successful project.
To start, research and identify reputable sod suppliers in your area. Seek recommendations from friends, neighbors, or local landscaping professionals who have had positive experiences with sod suppliers. Look for suppliers with a track record of providing high-quality sod and excellent customer service.
Once you have a list of potential suppliers, it’s time to contact them to inquire about their sod offerings and availability. Discuss your project requirements, including the area’s square footage and any specific sod preferences you may have. A knowledgeable sod supplier can guide you on the most suitable grass varieties for your climate, soil conditions, and intended use.
When placing your sod order, scheduling delivery or pickup for a time that aligns with your installation plans is essential. Coordinate with the supplier to ensure the sod arrives at your desired date and time, allowing ample time to prepare the site before the new lawn installation. Remember that sod is perishable, so prompt delivery is crucial to maintain freshness and viability.
Before finalizing your order, inquire about any special care instructions or recommendations for handling the sod upon delivery. Sod should be installed as soon as possible after delivery to ensure optimal health and establishment. Ensure that you have a clear understanding of any storage requirements or considerations if you’re not able to install the sod immediately upon delivery.
When it’s time to receive your sod, inspect it upon arrival and check for freshness, color, and overall health. Fresh sod should be vibrant green and free from yellowing or signs of disease or pest damage. If you notice any issues or concerns, address them promptly with the supplier to resolve any potential problems.
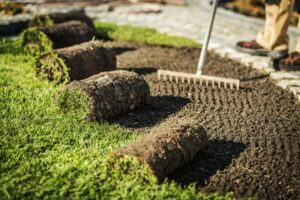
The Sod Installation Process
Once your sod has arrived, it’s time to install it. By following a systematic approach, you can ensure a successful and seamless installation. As mentioned above, sod installation can be difficult to do correctly, so we recommend that professionals take care of the process for you. You don’t want any problems to arise from improper installation. Here are the steps:
- Start installation on a cool, overcast day: It’s ideal to install sod on a cool or overcast day to minimize stress on the grass. If the weather is hot, consider watering the area lightly before installation to cool down the soil.
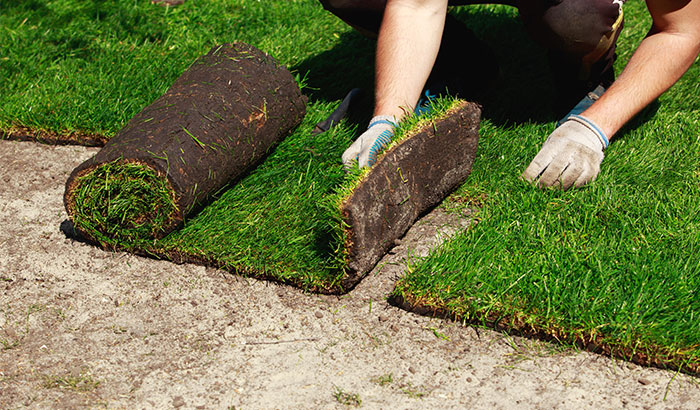
- Begin along a straight edge: Start laying sod along a straight edge, such as a driveway or sidewalk, to ensure a neat and uniform installation. Unroll the first piece of sod, aligning it tightly against the edge without stretching or overlapping.
- Lay subsequent sod pieces: Continue to lay the sod in a staggered pattern, similar to bricks, to create a seamless and interlocking effect. Avoid gaps or overlaps between the sod pieces, gently pressing them together to ensure close contact with the soil.
- Trim as needed: Use a sharp knife or sod cutter to trim the sod to fit around curves, corners, or obstacles like trees or flower beds. Ensure that the trimmed edges fit snugly against the adjacent sod pieces.
- Water immediately: Immediately after installing each section of sod, thoroughly water it to encourage proper root contact with the soil. Ensure that the sod is adequately saturated but not waterlogged.
- Compact and roll: Use a lawn roller or a weighted board to gently compact the newly installed sod. This step helps ensure good soil-to-sod contact and eliminates air pockets.
How to Take Care of Sod After Installation
While the hard work of laying the sod is now complete, your job as a caretaker has just begun. Proper post-installation care ensures your sod establishes strong roots, thrives, and becomes a lush, healthy lawn.
With a little attention and regular maintenance, you’ll enjoy the beauty and benefits of your new sod for years to come. Here are a few things to know if you’re wondering how to take care of sod after installation.
How Often Should I Water?
Proper watering is one of the key factors in establishing and maintaining a healthy sod. After new lawn installation, it’s crucial to provide adequate moisture to promote root development and ensure the survival of your newly installed sod.
However, finding the right balance can be a bit of a challenge. In this section, we will discuss the general guidelines for watering your sod and provide you with a framework to determine the appropriate watering frequency.
Immediately after grass installation, water the area thoroughly to saturate the soil and ensure proper root-to-soil contact. This initial watering is crucial for eliminating any air pockets and helping the sod establish a strong connection with the underlying soil. Aim to moisten the soil to a depth of 4 to 6 inches.
It’s important to keep the sod consistently moist in the first week following installation. Water the sod daily or every other day, depending on weather conditions. The goal is to ensure that the soil beneath the sod remains damp but not overly saturated. Overwatering can lead to shallow root growth or even the development of disease and fungus.
As the sod starts to establish roots, usually within two to three weeks after installation, you can gradually reduce watering frequency. Instead of daily watering, transition to a schedule of two to three times per week.
Keep a close eye on the sod and monitor its moisture levels. Factors such as weather conditions, soil type, and drainage may influence the watering needs of your sod. During hot and dry periods, you may need to increase the frequency and duration of watering to prevent the sod from drying out.
Remember to water early in the morning or late afternoon to minimize water loss through evaporation. Avoid watering during the hottest part of the day, as this can result in water wastage and potential stress to the sod.
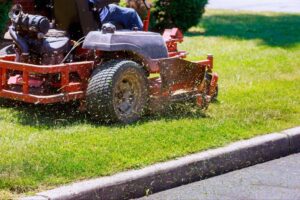
When Can I Start Mowing?
Proper mowing is an essential aspect of maintaining a healthy and attractive sod. However, it’s crucial to exercise patience before you start mowing your newly installed sod. Premature mowing can disrupt the establishment process and potentially damage the fragile roots.
The timing for the first mowing session depends on the growth rate of your sod and the establishment period. In general, you should wait until the sod has firmly rooted into the soil before introducing the mower. This typically takes around two to three weeks after installation, but it may vary depending on various factors such as climate, grass type, and maintenance practices.
To determine if your sod is ready for mowing, gently tug on a corner of the sod. If you feel resistance and the sod stays firmly in place, it’s a sign that the roots have taken hold. However, if the sod lifts easily or shows signs of dislodging, it’s best to wait a bit longer to allow for more root development.
When the time comes for the first mowing, set your mower blade at a height that does not remove more than one-third of the grass blade length. Removing more than one-third at once can stress the grass and hinder its ability to recover. Set the mower height to the recommended level for your grass type to promote healthy growth.
Ensure that the mower blades are sharp and in good condition. Dull blades can tear the grass rather than cut it cleanly, resulting in a ragged appearance and potential damage to the sod. A clean and precise cut helps the grass recover quickly and maintains a neat and uniform appearance.
Remember to mow when the grass is dry to prevent clumping and uneven cutting. Wet grass can clog the mower and create an uneven surface. It’s best to mow in the early morning or late afternoon when the grass has had a chance to dry out from morning dew or overnight moisture.
Do I Need to Fertilize?
Fertilizing plays a vital role in providing essential nutrients to your sod, promoting healthy growth, and maintaining its lush green appearance. While newly installed sod already contains some nutrients from the soil beneath, additional fertilization is often necessary to ensure its long-term health and vitality.
Newly installed sod typically benefits from an initial fertilizer application within the first four to six weeks after installation. This helps supplement the existing nutrients in the soil and provides a boost for the sod’s establishment.
However, it’s essential to follow the specific guidelines provided by your sod supplier or consult with a local lawn care professional to determine the appropriate timing and type of fertilizer for your specific grass variety and soil conditions.
Before applying any fertilizer, it’s crucial to ensure the sod has rooted properly and shows signs of active growth. Applying fertilizer too soon can potentially stress the sod or even burn the young roots. Wait until you see the sod actively growing and the roots well-established before fertilizing.
Choose Monarch Sod for a Flawless Lawn
Ready to transform your lawn? Take the first step towards a beautiful landscape by choosing Monarch Sod for your grass installation needs. Our team of experts is here to guide you through the process, ensuring a seamless and successful transformation.
Don’t settle for a patchy or lackluster lawn any longer. With Monarch Sod, you can enjoy the benefits of professionally installed sod that will enhance your curb appeal and provide a comfortable space for outdoor activities.
Contact us today at 801-893-9637 to schedule a consultation and get started on your sod installation journey. Let our team assess your needs, provide you with and install the right type of sod for your specific climate and soil conditions, and offer you a plan detailing how to take care of sod after we install it.
Experience the Monarch Sod difference and witness the stunning transformation of your outdoor space. Don’t wait – create the lawn of your dreams with Monarch Sod today.
toto slot toto slot toto togel toto slot situs toto situs togel